Posted by Wall Panels World on 5th Jun 2025
Media Wall Ideas | Panelling, Materials & Colours
Media walls have become the focal point of modern living rooms, creating a dedicated space that combines entertainment technology with visual appeal. These designs solve the challenge of integrating large televisions into your décor while providing storage and creating a cohesive look.
Planning tip: Measure your TV and plan the surrounding space first. Most effective media walls extend beyond the television width by at least 30cm on each side to create proper visual balance.
Media wall ideas and inspiration
From dramatic curved designs to minimalist floating cabinets, media walls can take many forms. The choice often depends on your room size, existing décor, and whether you want the wall to be a subtle backdrop or a bold statement feature.
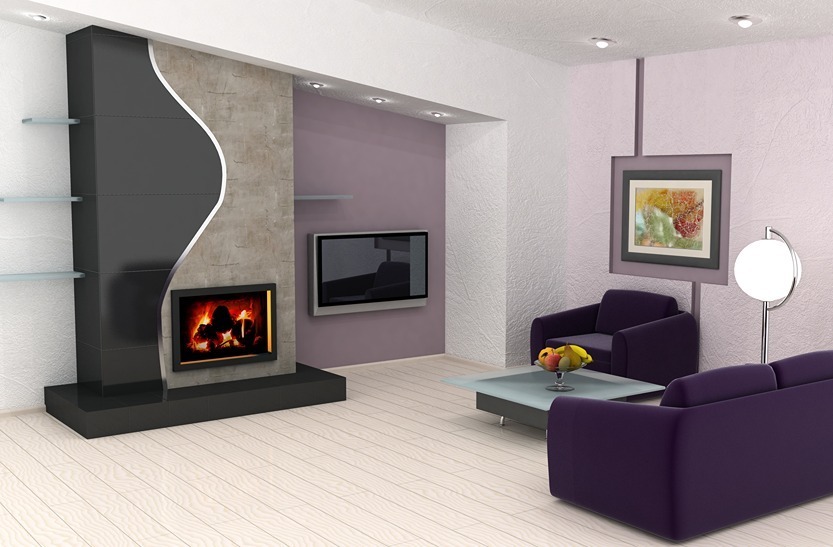
Curved feature with integrated fireplace
This striking design features a curved wall panel on one side of the electric fireplace, creating a flowing sculptural element. The television sits in the adjacent alcove area, while the purple accent wall demonstrates how bold colours can work when the media wall structure remains neutral. This approach separates the fireplace and TV into distinct zones.

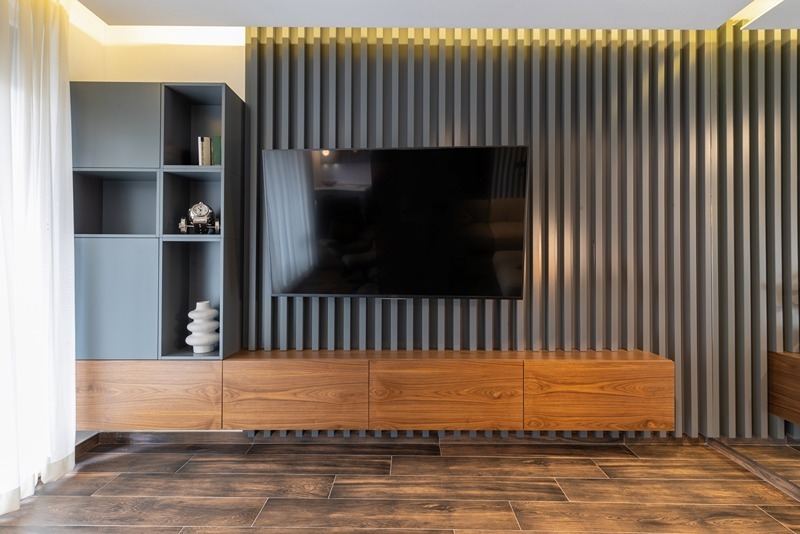
Vertical slat panelling with floating storage
Dark vertical timber slats create texture and visual height, while the low floating cabinet provides storage without breaking the wall's clean lines. The slats help hide any wall imperfections and create natural cable channels. LED strip lighting behind the panels adds ambient illumination in the evening.
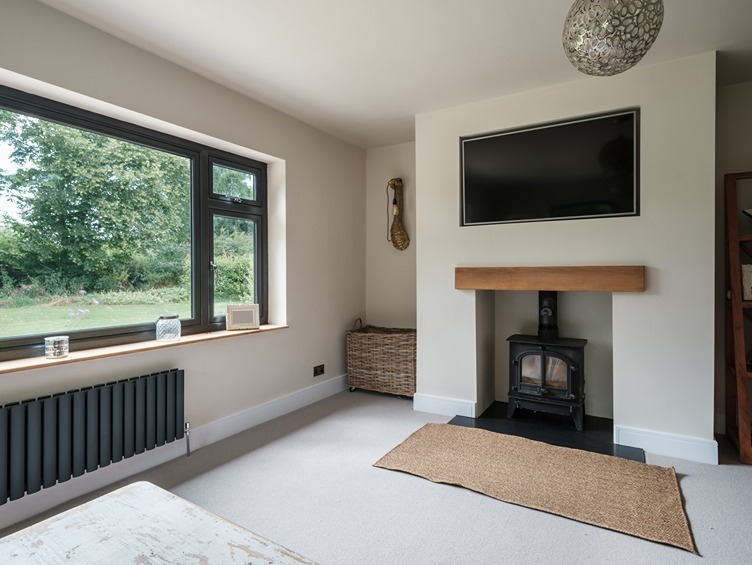
Traditional approach with real fireplace
Combining a wood-burning stove with wall-mounted television requires careful heat consideration, but creates a cosy focal point. The oak mantel adds traditional character while white painted panels keep the overall look fresh. This approach works well in both period properties and modern homes seeking a classic feel.
Full-width slatted design
Extended across the entire wall with matching side storage, this design works well in larger rooms where the media wall becomes the dominant feature.
High-gloss minimalist approach
Glossy grey panels create a sleek, contemporary feel. The minimal floating shelves provide display space without visual clutter, letting the television remain the focus.

Multi-purpose room solution
This design shows how media walls work in spaces that serve multiple functions. The timber slat panels provide acoustic benefits for video calls while the bright yellow console adds personality. The desk integration demonstrates how media walls can anchor flexible living spaces. This look can be acheived by using our Acoustic Wall Panels.
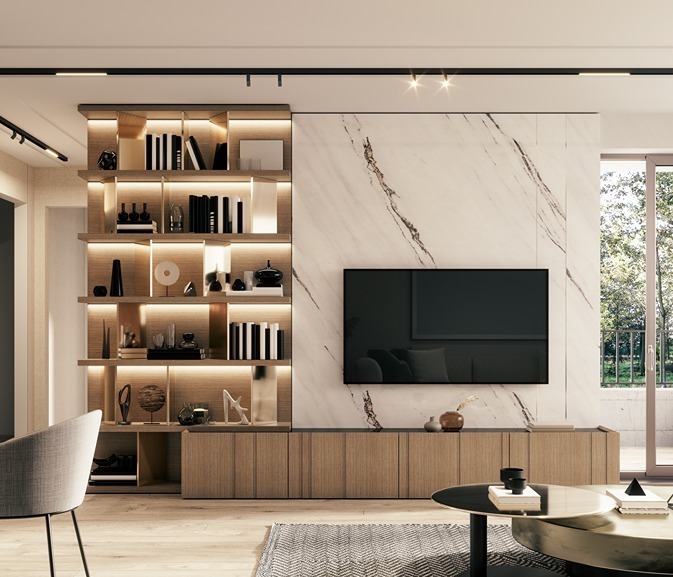
Marble effect with integrated lighting
Large-format marble-effect panels create a luxury hotel aesthetic, while the backlit shelving adds functional display space. The lighting highlights the stone pattern and provides ambient illumination for evening viewing. This approach works particularly well with contemporary furnishings.
Popular material approaches
Timber & Slat Panels
Natural warmth with texture
Stone & Marble Effects
Luxury appearance, easy maintenance
Smooth MDF Panels
Clean lines, any colour possible
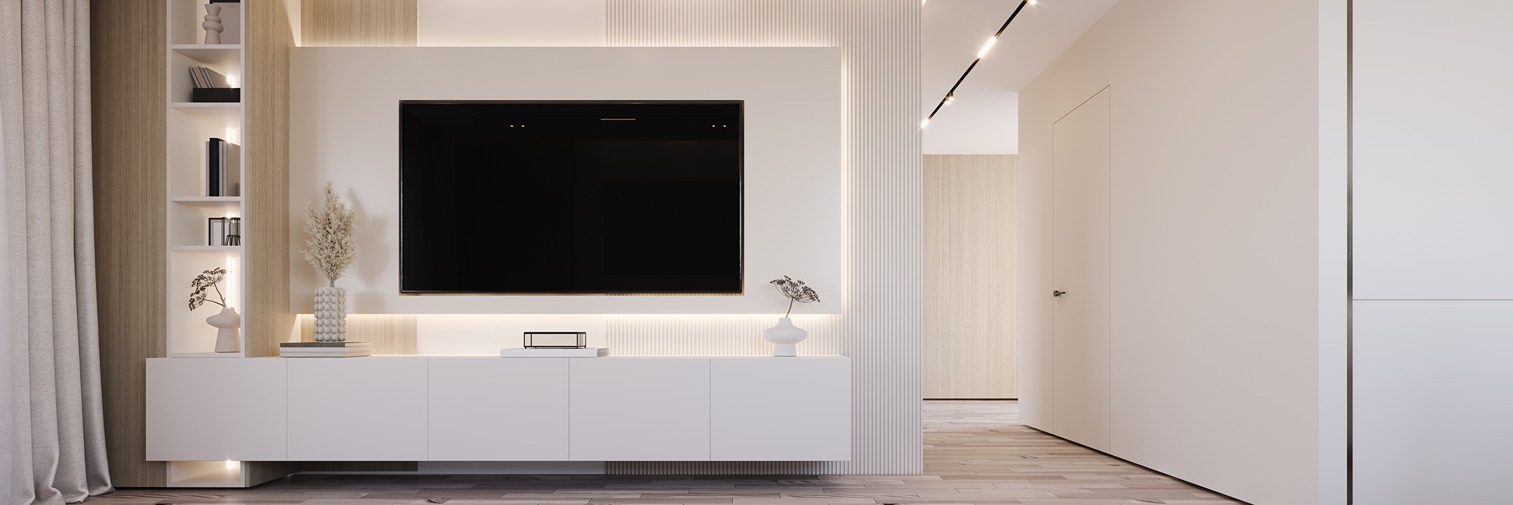
White panels with LED framing
Clean white panels with concealed LED strip lighting create a floating effect that makes the television appear to hover. The integrated shelving maintains the minimal aesthetic while providing storage. This approach works particularly well in smaller rooms where visual simplicity is important.
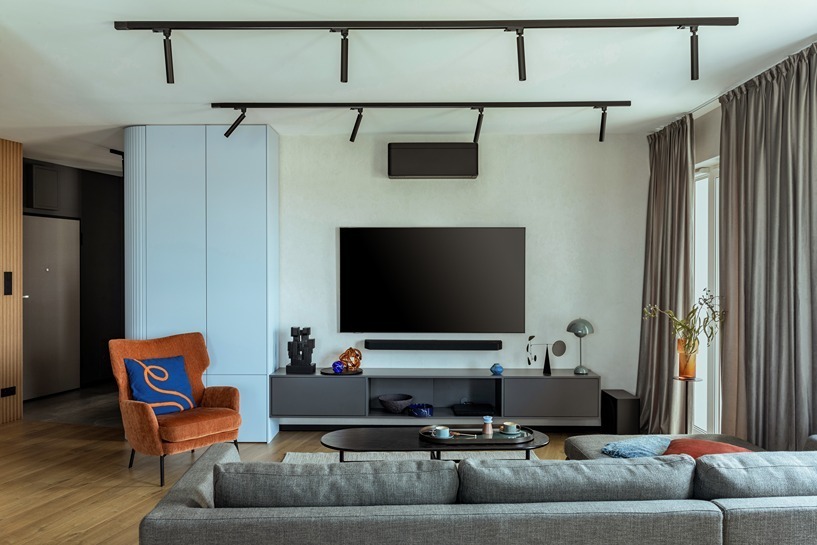
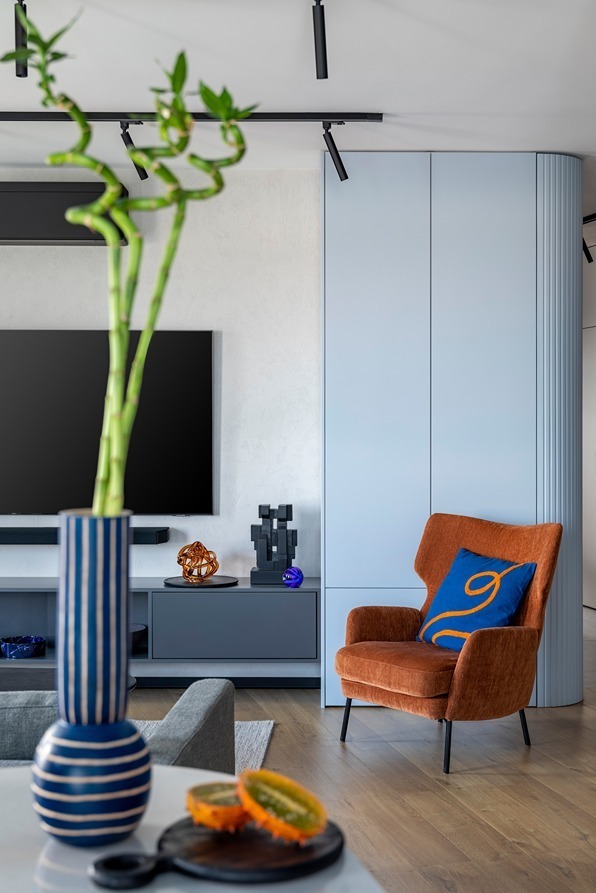
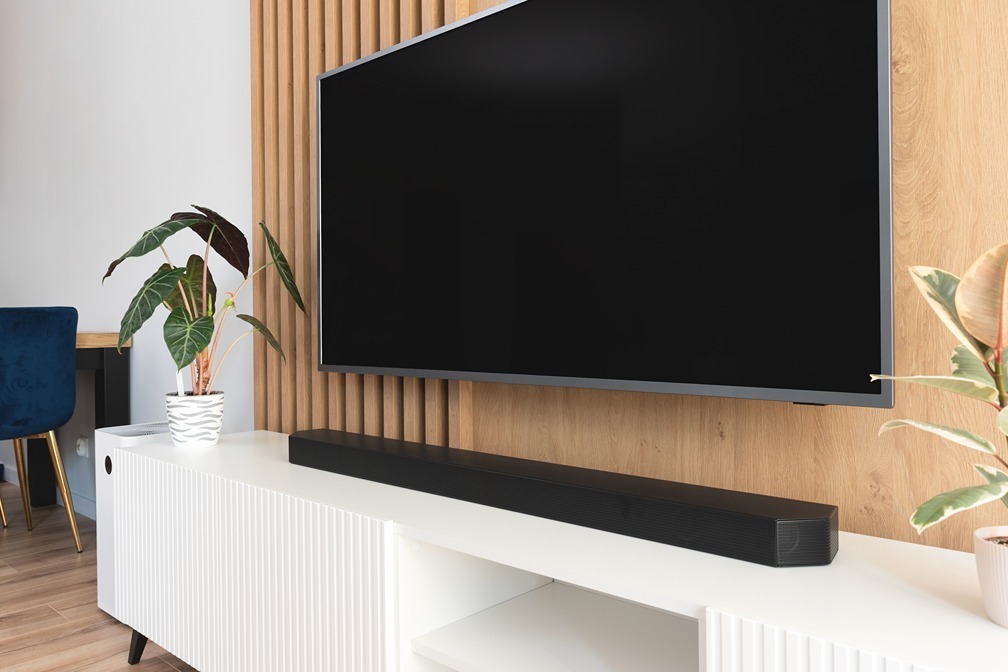
Contemporary with ceiling track lighting
This design shows how ceiling-mounted track lighting can highlight a media wall while providing adjustable illumination. The visible soundbar demonstrates practical equipment integration, while the orange accent chair adds colour without competing with the wall design. The dark panels help reduce screen glare.
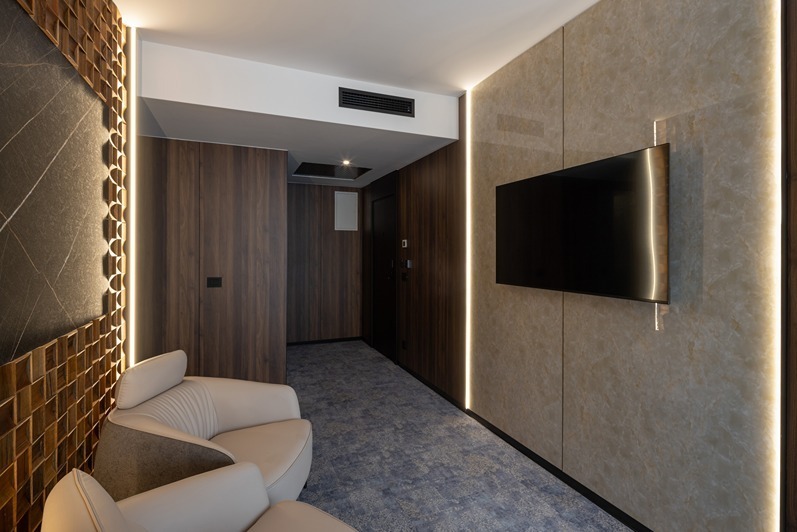
Hotel-style timber with ambient lighting
This design from a luxury hotel shows how rich dark timber panels with warm LED edge lighting create sophisticated atmosphere. The dramatic lighting helps define the media wall boundaries and adds visual depth. While designed for hospitality, this approach translates well to home cinemas or formal living spaces seeking a premium hotel aesthetic.
Sleek integrated cabinetry
Handle-free cabinets create clean lines while providing ample storage for equipment and media. The orange chair shows how furniture colours can complement neutral media walls.
Scandi-inspired with shaker panelling
Soft neutral shaker-style panels create a calming backdrop that doesn't compete with natural textures and muted colour palettes typical of Scandinavian design.
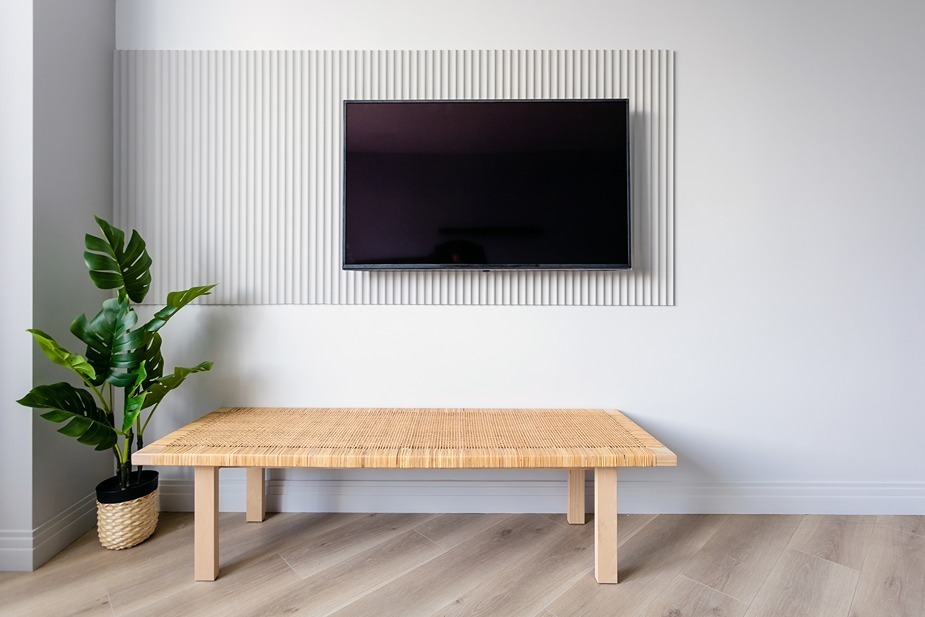
Ribbed panels with natural textures
Vertical ribbing adds subtle texture without overwhelming the space. Natural materials like the rattan bench complement textured wall surfaces beautifully.
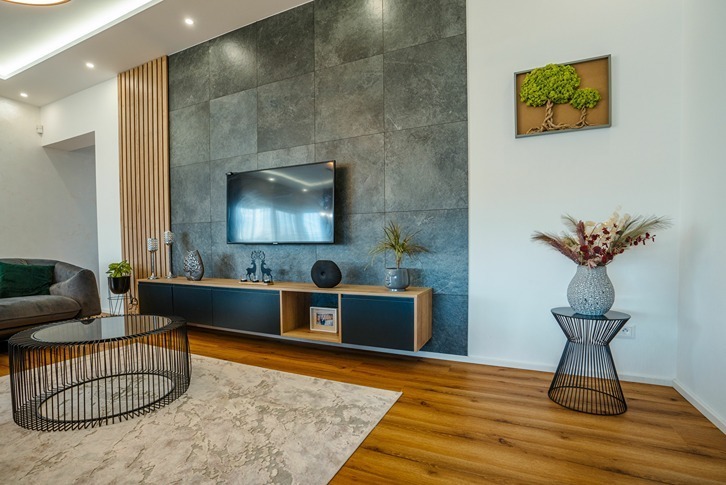
Stone-slate effect with floating storage
Large-format stone-effect panels create a dramatic natural backdrop that works well with contemporary furniture. The floating console provides practical storage while maintaining the clean lines. This type of finish works particularly well in modern homes with concrete or steel elements.

Rich wood with white floating credenza
Warm wood panels provide natural texture while the crisp white credenza creates contrast and practical storage space beneath the television.

Ceiling-height wood slats with LED
Extending the slat panels to ceiling height creates impressive vertical emphasis. Concealed LED strips provide both ambient lighting and visual definition.
Timber slats with textured console
The ribbed texture on both wall and console creates visual harmony while the colour contrast maintains definition between elements.
Lighting and storage integration
Effective media walls solve practical challenges while looking good. The best designs plan lighting and storage from the start rather than adding them as afterthoughts.
LED strip lighting behind panels or in grooves creates ambient illumination that defines the media wall edges. Most strips are dimmable and available in warm or cool white to match your preferred atmosphere.
Storage needs vary depending on your equipment. Modern setups might only need space for a streaming device and soundbar, while others require room for gaming consoles, Blu-ray players, and cable boxes. Floating cabinets beneath the TV maintain clean lines while providing adequate ventilation for electronics.
Cable management works best when planned early. Vertical channels behind panels conceal power and HDMI cables, while recessed areas can house power outlets and connection points. Include spare capacity for future equipment changes.
Installation tip: Run electrical cables and any networking connections before fixing panels to the wall. This saves drilling through finished surfaces later and ensures clean cable runs.
Colour schemes that work
Media walls need to balance visual impact with practicality. Dark colours hide dust and fingerprints better, while lighter shades make rooms feel more spacious. The key is choosing colours that work with your existing décor and viewing preferences.
Screen reflection and maintenance
Matt finishes reduce glare compared to high-gloss options, particularly important for rooms with large windows. Medium-toned colours like greys, soft blues, and sage greens hide dust better than pure white or black surfaces.
Light colours make small rooms feel larger, while darker tones create intimacy in bigger spaces. Neutral panel colours allow seasonal changes through cushions, throws, and artwork rather than requiring complete redecorating.
Planning your media wall
Getting proportions and layout right makes the difference between a professional-looking media wall and one that feels unbalanced. Start with measurements and work from there.
Measure your television and wall space
The media wall should extend at least 30cm beyond your TV on each side. For a 55-inch TV (122cm wide), plan for a wall spanning roughly 180-200cm to create proper visual balance.
Plan height and viewing angles
TV centres typically sit 100-120cm from the floor for comfortable viewing. If including a fireplace below, allow 30-40cm between the fire opening and TV for heat clearance.
Mark electrical and cable routes
Locate power outlets, aerial points, and existing cables. Plan routes for HDMI, ethernet, and speaker connections before installation to avoid drilling through finished surfaces.
Test proportions with templates
Cut cardboard to match your planned panel sizes and tape them to the wall. This helps visualise proportions and spot potential issues before ordering materials.
TV sizes and recommended wall widths
43" TV (95cm)
Wall width: 155-175cm
55" TV (122cm)
Wall width: 180-200cm
65" TV (144cm)
Wall width: 200-220cm
75" TV (166cm)
Wall width: 220-250cm
Creating your media wall
A well-designed media wall balances visual impact with practical function. Whether you choose textured timber panels, smooth painted surfaces, or luxury stone effects, the planning principles remain the same.
Measure carefully, plan cable routes early, and consider how lighting will enhance both your viewing experience and the wall's appearance during daytime. The materials you choose should complement your existing décor while serving your practical needs.
Start with free samples to see how different finishes look in your home's lighting. This small step can save significant time and expense during the planning process.
Ready to start your media wall project?
Explore our wall panelling collection to find materials that match your vision. From acoustic slat panels to smooth finishes and textured effects.